
There comes a time in the life span of every vinyl cutter where the blade has dulled out or chipped, and you must change it. This is perhaps one of the most important details of caring for your vinyl cutter, and it may also seem one of the more daunting tasks of maintenance.
Fortunately, the knowledge involved is relatively simple… once you’re aware of how to do it.
45° BLADES AND 60° BLADES
Most cutters take 45° blades and 60° blades available. The first question you should ask is which blade angle you should use. To understand why blade angles are significant, you first have to understand how plotters work.
Back when plotters were first invented, they were initially used to draw CAD file designs on sheets of paper using pens rather than blades. Because of that, they’re designed to plot from the direct center of the item held in the plotter head.

When plotters started integrating blades to cut material, it became apparent that the blade will need an edge rather than a simple sharp tip. For a blade to have an edge and swivel, there needs to be an angle… which creates an offset from the center of the blade-holder.

Blades are measured from the angle of the blade in comparison to a 90 degree angle, meaning that a 60° blade is measured from the area it’s angled to cut… that effectively put’s the solid metal angle of the blade at 30°.

If you notice above, the 45° has a shorter blade path length than the 60° blade. This makes the 60° more suitable for thicker substrates like Brick, Sticky Flock, Twill, or Duoflex. However, a longer blade path is not always a good thing… Due to the longer blade path, a 60° blade can have a larger offset on thinner materials like Standard HTV, Flock HTV, Met-Stretch, or even Glitter. In these instances, a shorter blade path on a 45° blade is better suited for the job.


CHANGING YOUR GCC BLADE
To remove the blade-holder from the cutter, gently unclasp the holder on the cutter, and remove the blade-holder.


GCC cutters have two separate types of blade-holders that are currently in rotation… the Brass blade-holders and the Gunmetal blade-holders. When purchasing a new blade, it’s extremely important to determine which one you have. Please look below to see the difference:

If you’re using the Brass blade-holder, you’ll use the Roland Blades. If you’re using the Gunmetal blade-holder, you’ll use GCC Blades.
Simply push the plunger to eject the blade out, and grab the blade to pull it out.
Then simply put the replacement blade into the holder the same way you ejected the blade, and use a hard flat surface to gently push the blade in place.
Use the top knob to adjust your blade so that it barely sticks out of the tip of the holder. It should not stick out further than the thickness of a credit card before you stick it back into the cutter.

Then, place the blade-holder back in the cutter as you removed it, and clasp it shut again. Make sure the blade-holder is firmly secured under the clasp lip (as seen below). This will conclude replacing your blade for the GCC.


CHANGING YOUR GRAPHTEC BLADE
To remove the blade-holder from the cutter, twist the clasp counterclockwise until the clasp is loose enough to allow you to pull the blade-holder up out of the plotter head.

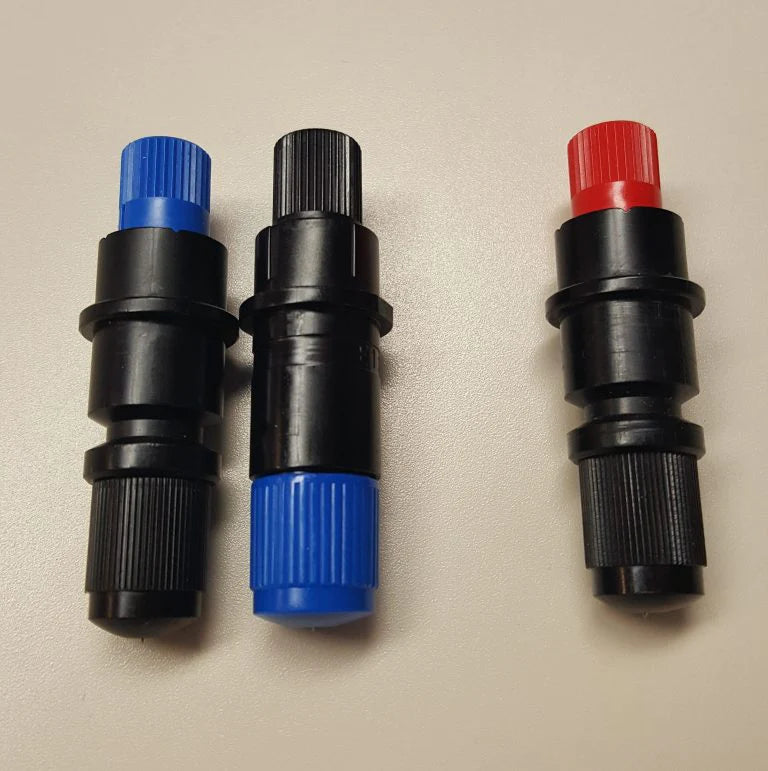
There are two popular blade-blade holders that the Graphtec plotters use: The CB09N (blue and black) and the CB15N (red and black).

The 09 and 15 numbers correspond to the blade thickness in the holder… the 09 is 0.9 mm in diameter… the 15 is 1.5 mm in diameter. For this reason, CB15 blades will not fit in CB09 blade-holders, and CB09 blades will jiggle around loosely in the CB15 blade-holder. Because of that, it’s extremely important to get the right blade. Just remember:
CB09 Blades – Blue Blade-holder
CB15 Blades – Red Blade-holder
There are currently two versions of the CB09 blade-holders floating around… new ones with the blue caps, and older ones with blue adjustment knobs. To start on both, unscrew the blade cap to get to the blade. On the older ones, the cap will be black. On the newer ones, the cap will be blue.
The older blade holders will require you to remove both the blade and the spring. The newer ones have the spring built into the cap, so use your fingers to press down on the blade shaft and grab the blade to pull it out.
On the older one, you’ll first have to take the new blade and thread the blade with a replacement spring before loading it back on into the blade-holder.
On the newer one, you may simply insert the new blade into the blade-shaft.
Then you re-screw the caps back onto the blade-holders
As far as the CB15 blade-holders go, they’re relatively as straightforward as the newer CB09 blade-holders that do not require a spring. The steps are the exact same as the newer CB09 blade-holders.
In both instances, use the top knob to adjust your blade-holder to cut the appropriate material. Typically that will mean extending your blade out less than the thickness of a credit card. When cutting thicker substrates though, we recommend further extending the blade out around the thickness of 1.5 cards.
When placing the blade-holder back, slide the blade-holder down into the plotter head, ensure that the clasp is flush down to the arm, then screw in the clasp to hold the blade-holder firmly.
CHANGING A ROLAND BLADE
To remove the blade-holder, untwist the fastener counterclockwise to loosen up the blade holder so you can remove it. If you’re attempting to do this on a Roland Print/Cut machine, you’ll have to get the printer to move out the carriage head. To do this, press Menu, scroll to Sub-menu, press right, scroll to Maintenance, press right, scroll to Replace Knife, press enter. This will move the carriage head out so you can remove the blade-holder.

There is really only one blade-holder for the Roland family, and they’re fairly easy to replace. Use the plunger to eject the blade out, grab the blade with your fingers, pull it out of the holder, insert the new blade the same way, and gently push the blade into place by pushing it in using a flat hard surface.


Then use the blade cap to twist left and right to adjust the blade depth. Generally your blade depth should not be any further out than a credit card.
Changing a Silhouette Blade
To remove the blade-holder, twist the fastener to the left to loosen the blade-holder clamp and slide the blade-holder up.


Open the replacement blade-holder pack and use the adjusting piece to adjust the blade out to the required depth. Typically for most HTV, that is about 2 or 3. Then re-insert the new blade-holder into the machine and twist the fastener right to clamp it in.
filed under: Blogs, Equipment, Vinyl Cutters